On Thursday, the 19th of May 2022, the new Solar Installation Standard (AS/NZS 5033:2021) became mandatory after a 6-month transition period. For your average bloke on the tools, interpreting Australian Standards is about as fun as a punch in the head. The new “Installation and safety requirements for photovoltaic (PV) arrays” a.k.a “5033” is more like a round in the octagon with Connor McGregor.
In this post, I summarise the major AS/NZS 5033:2021 changes and how we will apply them at MC Electrical. I explain the new rules that you need to follow if you want to get rid of the despised rooftop isolator. I explain drip loops and drain devices and explain why we prefer the drain device. I then outline how many disconnection points or Rooftop isolators you need in different situations – because it is ridiculously hard to work that out from a casual read of AS/NZS 5033. I also explain a pretty neat way to do a triple parallel.
At the end, I’ve given comprehensive signage and labeling requirements. I’ve included the signs required by 4777.1, so you have it all in one spot. You can also download our version of the site plan and our site plan sticker kit.
DC Cable Run
The biggest change to the standards is the option to remove rooftop isolators. However, if you remove rooftop isolators, you need be careful how you run your DC cable through the roof cavity, keeping it either close to the eaves or 600mm above the ceiling.
DC cable compliant with IEC 62930
But before you jump into the ceiling space, make sure you have the right cable. That solar cable that you were using at the beginning of May is now only good for scrap copper. Solar cable now has to be compliant with the international standards IEC 62930 and be rated at 1500 volts. The industry only cottoned on to this issue when the CEC published a notice about it on May the 4th. Now manufacturers, suppliers, and installers are scrambling for supply.
The new solar cable is fatter
A pain for installers is this cable is fatter. The new solar cables I’ve seen have a single core 0.7mm bigger
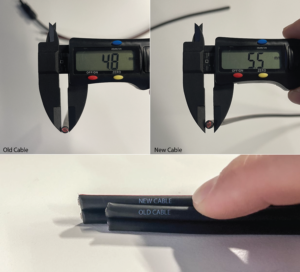 than our old cable. That’ll make it annoying to pull two strings and earth through a 25mm conduit. We’re looking for the thinnest compliant cable and will keep this blog updated.
You might think twice when you are tightening up an MC4. The typical 4mm MC4 is good for sheath dimensions up to 6mm, whereas the larger 4mm MC4 starts at 5.5mm. Stick with the MC4s you have, even though the thread doesn’t screw in as much as you are used toIronically part of the reason for the cable change seems to be because the new solar standards say we can run up to 1000 volts d.c. on residential jobs. Except we can’t.
The problem with 1000 volts on residential
Everyone got a little excited when they found out the new AZ/NZS 5033 2021 standard permits 1000 volts on residential installations. Then, after the standards were published, some inspector spoiled the party and pointed out we also need to comply with AS/NZS 4777.1:2017 clause 2.3.
Installations in domestic dwellings shall not have a maximum d.c. voltages that span greater than 600 V.
So we’re still at 600 volts for resi until 4777.1 is amended. Australian Standards are only allowed to go through a couple of amendments before they need to be entirely rewritten. So that minor change isn’t going to happen anytime soon. But let’s get back to the good news.
DC Disconnection point
When you find some new solar cable, and if you can run that cable as above, then congratulations: you get rid of the much-despised Rooftop Isolators. You’ll need to install disconnection points instead, which is just a couple of MC4s readily available and labeled.
- Readily available means you must be able to easily access the MC4’s for inspection or replacement without removing a solar panel.
- They must be installed within 150mm of the panel edge.
- Labeled in accordance with the label guide at the bottom of this page.
- Later in this post I explain how many disconnection points you need to use.
Top Entry into Isolators
The old 5033 said we can never enter via the top of the isolator. Not that we ever use DC isolators next to Fronius inverters, but it’s good to know the old blanket rule has been reviewed

DC cable drip loops
Under the old 5033 standard, we would run conduit from the roof all the way to the isolator and attempt to prevent water ingress with the use of a multihole gland on the roof. If this conduit run was not airtight, then we could have condensation build up in the conduit run, which would make its way into the isolator.
The new standard gives two ways to solve this issue. The first way is a bit un-tradesman-like. Just stop the conduit short -no glands on the end of the conduit- and bring the bare solar cable into the inverter through a multihole gland. In this method, you don’t even need to gland the conduit under the panel. I’m not a fan of leaving DC cables exposed to be chewed by a dog, or an adventurous kid. Neither am I a fan of having an open conduit running from your roof through your ceiling.
When possible, I prefer the more robust way.
Drain device
If you want to run your conduit neatly into the inverter, then you’ll need to make sure that the conduit doesn’t act as a water pipe. Many inverters don’t give you the option of running conduit all the way into the inverter – but Fronius does. Because we only install Fronius inverters, we install a “drain device” at the end of the conduit below the Fronius inverter. This protects the solar cable at the most vulnerable spot – while eliminating the possibility of water ingress. (We get our drain devices from PV Connections)
We then install multihole glands on the top end of the conduit under the panel. This reduces the risk of the drain even needing to be used – except for the odd drop of condensation.
If we need to use Roof Top Isolators, we put them in the compact Clenergy RTI enclosures because they offer the best UV protection. However, to protect the cable from harsh UV we prefer to bring conduit straight into the RTI. To comply with the new 5033 standards, as soon as we bring the conduit into the RTI, we must use a drain device on the conduit. Fair call. Nobody wants condensation getting into an RTI.
Cl 4.4.7.2.3

Multihole Glands
Multihole glands are only required where the exposed DC cable enters a DC isolator or inverter without conduit. As mentioned earlier, I’m not a fan of cutting corners – I prefer accessible DC cables to be in conduit where possible.
However, to avoid water tracking into the roof, we’ll still use multihole glands for our panel interconnects cables that enter a ceiling space.

How Many Disconnection Points and RTIs?
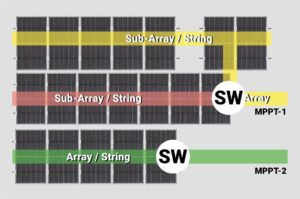
One Friday night I asked a question on the “Solar Cutters” forum about the number of Disconnection Points required (4.3.3.1) in a particular setup. I realised many in the industry had the definition of string, array and sub array confused. Here it is in picture form, complete with the number of disconnection points (DP) or Roof Top Isolators required (RTI). After arguing my point with industry experts, and with the help of my mate Glen Morris, I believe the below examples are compliant with the AS/NZS 5033: 2021 standard.
Example 1. Disconnection points
Note there is a gap between the panels on the blue array. It is irrelevant how large that gap is. Obviously, a disconnection point does not need to be adjacent to every panel in the array. Nowhere in the standard does it say that every panel in an array needs to be adjacent to one another. Therefore, if the disconnection points (MC4’s) are adjacent to just one panel in the array, it is logically considered adjacent to the whole array.
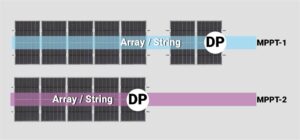
Example 2. Disconnection points with parallel strings
Note the two strings can face different orientations and nothing in the standards says they need to be within “arms reach”. However, when we use DPs, we need 1 set of MC4s per string
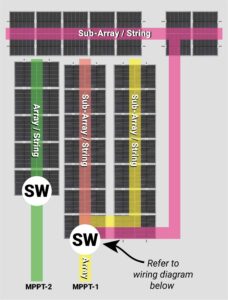
Example 3. Roof Top Isolators
Again, if you have a large gap between the panels on the blue array, it is irrelevant. If an RTI is adjacent to 1 panel, logically it is adjacent to the array.
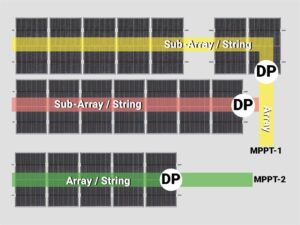
EXAMPLE 4. RTIs With ON A PARALLEL ARRAY
Again, the two sub-arrays can face different orientations. A decent string inverter will handle this easily. However, unlike Disconnection Points, when using an RTI, you only need one RTI per array – rather than one per sub-array. The fewer RTIs, the better.
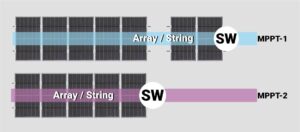
Example 5. Triple parallel with RTI’s
This one is a head-scratcher – but it’s one worth following through if you use the old school dodgy Sunpower Maxeon or awesome new REC Alpha Pure panels. The reason I love this solution is it means we can deal with complex roofs without the use of expensive and likely unreliable rooftop power electronics like Enphase, SolarEdge or Tigo.
If a panel has a “string fuse rating” higher than twice the short circuit current of the panel, then we can easily triple parallel without string fusing. However, in this situation, it is not feasible to use disconnection points. Instead, we can use one correctly rated Double pole ZJ Benny DC isolator to switch all 3 parallel strings.
The switch needs to operate in such a way that once it is turned off, we no longer have a triple parallel situation under the panels. The wiring diagram for such a setup is below.
5033 & 4777.1 Solar Signage Guide
Below is a guide on installing the new solar labels in plain sparkie English. I’ve included the labels required in AS/NZS 4777. I don’t mind the changes required by the new 5033, especially the site plan. But it will be interesting to see how the cowboys deal with this.
Roof Labels
 Man Hole Label – (or personnel access hole label if that’s how you roll). Only needed if using DP’s and the DC cable run is in the roof space. Attach this label so that it is adjacent to the manhole in the ceiling. (visible and within arm’s reach)
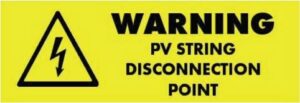 PV String Disconnection Point – Install this label on the rail within 300mm of the DC disconnection point MC4’s.
![]() DP Tags – Install these within 100mm of the DP MC4 plugs. One on the positive and one on the negative.
DP Tags – Install these within 100mm of the DP MC4 plugs. One on the positive and one on the negative.
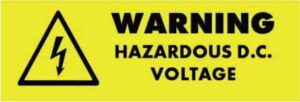 Warning Hazardous DC Voltage – If you ever join DC cables in a junction box, use this to label the j box.
Inverter Labels
 Warning Multiple DC Sources – install this on or adjacent to the inverter pretty much always. To be specific, if you are using both inverters MPPTs install this label on or adjacent to the inverter, because you will have multiple disconnection points on the roof. (5033 – 5.2.1).
 PV Array DC Isolator – You probably only need to install this on inverters with a built-in DC isolator. RTIs also need to be labeled but they often come correctly engraved. (5033 – 5.5.2.1)
 Solar Shutdown Procedure – Install on or adjacent to the inverter. If the inverter is installed adjacent to the switchboard it’s directly connected to (i.e.: the switchboard with the solar breaker), you can install this label within that switchboard to minimise the visible label graffiti. (5033 – 5.7)
Inverter AC Isolator – Use this if you need an AC isolator adjacent to the inverter (4777.1 cl6.8). You will need an AC isolator adjacent the inverter if the switchboard is not visible from the inverter and within 3 meters (definition of adjacent, (4777.1 – 3.4.3).
Switchboard Labels
 Main Switch (Grid Supply) – Used to label the main switch at the MSB. (4777.1 6.2)Note: If the house is in a unit complex, the MSB is NOT the complex’s MSB.
 Main Switch (Inverter Supply) – Used to label the inverter circuit breaker. (4777.1 – 6.2)
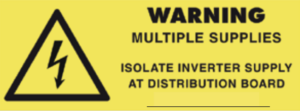
Warning Multiple Supplies – This sign is to be installed in a prominent position on the switchboard that the solar is connected to. (4777.1 – 6.4)
 Main Isolator (Normal Supply) – Used to label the main switch of the sub-board that the inverter is connected to. (4777.1 – 6.2)
 Warning Multiple Supplies – Install this label on every switchboard/distribution board between the main switchboard and the sub-board that the inverter is connected to.(Not required on the board that the inverter is connected to and not required on any other unrelated boards, eg: the neighbouring unit). (4777.1 6.3)
Meterbox Labels
PV (DP) – Install this label on the meter box lid when using disconnection points as the isolation method.
 PV (SW) – Install this label on the meter box lid when using DC isolators as the isolation method.
 PV (AC) – Install this label on the meter box lid when using AC solar systems, e.g.: Enphase. (5033 -5.6).
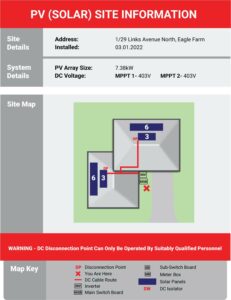
Site Map – Complete a site map like this example, put it in a durable plastic sleeve, and fix it inside the meter box lid. Feel free to save and download this sample.
- Before the job, we insert the Nearmap image of the house and fill in the customer details.
- We designed sticker kits of items in the map key so the finished plan is neater.
- The sparkie just has to draw in the cable route with fine tip coloured pens.
Site information sticker kit
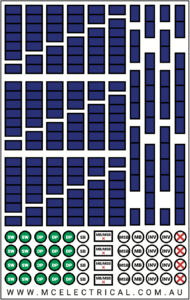 We designed this sticker kit to make life easy for our sparkies and so we don’t end up with illegible scribbles on a page.
If you’d like to use these Sticker Kits, you can! We’ve asked our printer to make them available to anyone. Just click this link to E-Print. It’s all set up and ready for you to make an order. Drop us a comment below if you order them – it would be nice to know that they are being used!
Conclusion
The new AS/NZS 5033:2021 is a pig of a document to interpret. It has some last-minute curveballs that nobody noticed till the 11th hour. It also has some welcome changes – the ability to remove RTIs and clearer signage. The details above should help a solar sparkie with the majority of changes. However, those who have read the new 5033 changes will know that there is a lot open to interpretation. If you think I’m wrong on any of my interpretations, or if you think I’ve missed something important, I’d appreciate your feedback in the comments below.
If you want a deeper dive into the new standards, I’d highly recommend the AS/NZS 5033 crash video course by industry legend Glen Morris. It’s 6 hours long, $330, and worth every penny.

8 Responses
I was excited to uncover this website. I need to to thank you for ones time for this particulsrly
wonderful read!! I definitely enjoyed everry par of it and i also have
you saved to fav to see new information in your site. https://Odessaforum.Biz.ua/
Thanks, mate. A huge effort to put this together. You certainly made it easy for me to catchup and understand. Well done!!
Thank you Mark for a great summary of the new update. Regarding complying with AS/NZS 4777.1:2016 clause 2.3 restricting 600V in domestic installations, the requirement mentioned a maximum 600V DC voltage in domestic installations and restricted access for non-domestic systems with over 600V DC (https://www.gses.com.au/asnzs4777-keyupdates/#:~:text=MaximumDCVoltageandRestricted,ASNZS50332014). This article stated that the definition of restricted access is consistent with AS/NZS 5033:2014, where if HD conduit is used on all accessible cabling, up to and including the inverter terminals, and the DC isolators and protection devices are in enclosures only accessible with a tool, then there is no need for additional barriers. Does that mean that with proper cabling as per the AS/NZS 4777.1:2016 restricted access standards, domestic installation of up to 1000 V should be possible?
Great blog – has there been any clarification on the AS5033 Clause 4.4.2.5 PV cables underground? (something we do all the time with nylon sheathed string and array cables at utility scale, but local installer informed me cannot do for my residential install as he had been bounced by inspector previously, even with cables in conduit, which would have been compliant to AS3000 Table 3.5)
Legend. Thanks for compiling all of this, really concise. It’d be great if the regulating board took note.
Thanks Mark, a very easy to read an informative summary. My opinion.. for what it’s worth, the new standard has left installers short… what a shit show! The RTI will remain on my installs until I’m convinced otherwise, with multi hole glands and shade covers I think they are pretty good. Labels on conduits, SW, DP, AC on the PV label.. wow, do we seriously think fireys attending a house fire will be able to make heads nor tails of this! Well done on your summary.
Excellent read. I will definitely be asking my solar installer a lot more questions. Better yet, any chance you can come down to Canberra to do my install?
Great article, but no images even though you refer to them. Any chance of a update?